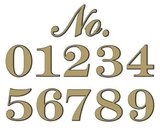
Victorian Gold Foil Adhesive House Number - 6" High - Sold Each
To apply adhesive house numbers to the outside of a glass or metal surface you will need the following items:
- Glass Cleaner
- Paper Towel or Towel
- Dry Erase Marker
- Level
- Scotch Tape or Painter’s Tape
- Ruler or tape measure
- Flexible Smoothing Tool (Included)
Directions:
- 1. The surface must be clean and dry before application. Clean glass or metal surface thoroughly with glass cleaner. Dry the surface with a towel.
- 2. Decide on the height you wish to install the numbers and decide where your bottom edge will be. Using a level and a dry erase marker, draw a horizontal line across the window or door to denote the bottom edge of the numbers.
- 3. Find the center of the door or window on which you plan on installing the numbers by measuring the width of the space and dividing by 2. This will give you the center point. Mark the center point with a dot using a dry erase pen 1” below your horizontal line which you applied in step 2.
- 4. Position the adhesive house numbers WHILE STILL ON THE BACKING PAPER into the position you desire, adjusting them to be evenly spaced using the center point you have marked. Tape them into place using scotch or painter’s tape on the backer paper. Then step back and see if they look right. Reposition as needed to get them just right. Leave between 1/2” and 1” of space between each number. This space may vary between each number depending on the shape of the number.
- 5. Using the dry erase marker, put a dot on the glass or metal at the top and bottom center point of each number once you have found your ideal spacing. The bottom dot should be below your horizontal line.
- 6. Remove the taped numbers from the door or window. You should now have a horizontal line and a series of dots denoting the center position of each number you will be applying.
- 7. Remove the backing paper from the number closest or in the center of the series of numbers you are going to apply. Put this one on first. Starting at the bottom of the number, carefully and lightly apply the bottom ¼” of the adhesive side of the number to the glass along the top edge of the horizontal line you have drawn on the surface of the door or window. You can reposition the number only if you have applied it lightly and only if you have applied only the bottom ¼”. Once the bottom edge is affixed in the position you desire, slowly work the number onto the surface moving from the bottom to the top. Use the flexible smoothing tool to lightly burnish the number down and work out any air bubbles by moving them to the edge of the number with the smoothing tool.
- 8. Repeat the process with the rest of the numbers using the dots to tell you where the center of each number should be.
- 9. Using the glass cleaner, wipe off the remaining dry erase marker dots and lines.
Troubleshooting: It is not unusual for some air bubbles to remain or be difficult to remove but most are small enough that they do not show up when viewed from a normal viewing distance. These numbers are not intended to be installed more than one time. We offer no guarantees that you can successfully remove and reinstall a number without damaging it. But if you need to try this, to remove a number that you have made a mistake on during installation, use a sharp 5-in-one scraper to peel up the longest edge of the number very slowly and gently. In most cases this may damage the number by stretching the gold foil, but in some cases you may be able to remove and reinstall the number.


