
-
Antique Items
- Antique Bath Items
- Antique & Vintage Books
- Antique Cabinets
- Antique Doors
- Antique Fireplaces
- Antique Furnishings
- Antique Garden
-
Antique Hardware
- Antique Bin Style Drawer Pulls
- Antique Cabinet & Furniture Locks
- Antique Cabinet Hinges
- Antique Cabinet Keyhole Covers
- Antique Cabinet Knobs
- Antique Cabinet Latches
- Antique Casters and Paw Feet
- Antique Coat & Bath Hooks
- Antique Curtain Hardware
-
Antique Door Hardware
- Antique Padlocks
- Antique Dead Bolts & Night Latches
- Antique Chicago Niles Door Hardware
- Antique Door Bells
- Antique Door Bolts
- Antique Door Hinges
- Antique Door Knobs
- Antique Door Knockers
- Antique Door Plates
- Antique Door Pulls & Push Plates
- Antique Door Rosettes
- Antique Door Sets
- Antique Door Stops & Holders
- Antique Entry Door Thumblatch Pulls
- Antique Gilbert Door Hardware
- Antique Door Keyhole Covers
- Antique Lock Parts
- Antique Mortise Locks
- Antique Pocket Door Hardware
- Antique Rim Locks
- Antique Storm and Screen Door Hardware
- Antique Thumblatch Door Sets
- Antique Unit Locks
- Antique Drawer Pulls
- Antique Icebox Hardware
- Antique Kitchen Hardware
- Antique Mail Boxes and Letter Slots
- Antique Pulleys
- Antique Stair Hardware
- Antique Window Hardware
- Antique Heat Grates
- Antique Iron & Tin
- Repurposed Antiques
- Antique Kitchen
- Antique Lighting and Electrical
- Antique Radiators
- Antique Stained Glass
- Antique Tile
- Antique Woodwork
-
Bathroom
- Bath, Body & Home
- Antique Bath Items
-
Bath & Body Care
-
Bath and Body By Manufacturer
- Aura Cacia
- Andalou Naturals
- Apotheke
- Archipelago
- Baudelaire Soap
- Beekman 1802
- Better Life
- Boss Razors
- Burt's Bees
- Caswell-Massey
- Claus Porto Soaps
- Compagnie de Provence
- Deep Steep
- Dr. Bronner's
- Dresdner Essenz
- Edwin Jagger
- EO Products
- Fringe Studios
- Gianna Rose Atelier
- Grandpa Soap Company
- Humphreys
- J. R. Watkins
- K. Hall Designs
- Kalastyle
- Lafco
- Michel Design Works
- Panier des Sens
- Me! Bath
- Mistral Soaps
- Mrs. Meyers Clean Day
- Nesti Dante
- Pre de Provence Soaps
- San Francisco Soap Company
- Simply Be Well
- Soap & Paper Factory
- Sweet Grass Farm
- Thayers
- Thymes
- Urban Spa
- West Third Brand
- Yes To
- Bath Sponges & Accessories
- Body Lotions, Balms, & Oils
- Bubble Bath, Salts, & Bombs
- Facial Care
- Foot Care
- Gift & Guest Soaps
- Hair Care
- Kid Stuff
- Liquid & Bar Soap
- Men's Toiletry Products
- Pain Relief & First Aid
-
Bath and Body By Manufacturer
- Bathroom Furnishings
- Bathroom Sinks & Vanities
- Bathtubs & Showers
- Faucets for Sinks, Tubs, & Showers
- Toilets & Parts
- Cleaning & Restoration
- Curb Appeal
-
Hardware
-
Cabinet & Furniture Hardware
-
Shop By Style
- Art Deco Cabinet Hardware
- Chippendale Cabinet Hardware
- Colonial Revival Hardware
- Contemporary Cabinet Hardware
- Craftsman Cabinet Hardware
- Eastlake Cabinet Hardware
- European Cabinet Hardware
- Industrial Cabinet Hardware
- Medieval Cabinet Hardware
- Retro Cabinet Hardware
- Rustic Cabinet Hardware
- Victorian Cabinet Hardware
- Bed, Chair and Table Hardware
- Bottle Openers
- Cabinet Hardware Backplates
- Cabinet Knobs
- Cabinet Hinges
- Cabinet Latches
- Cabinet Locks
- Casters & Pawfeet
- Clearance Cabinet Hardware
- Drawer Slides
- Drawer & Cabinet Pulls
- Icebox Hardware
- File Cabinet Hardware
- Keyhole Covers & Keys
- Nails, Tacks and Brads
- Shelf Pins & Brackets
- Wood & Machine Screws
-
Shop By Style
-
Door Hardware
- Deadbolts
- Door Bells
- Door Bolts
- Door Closers
- Door Hinges
- Door Keyholes
- Door Knobs and Levers
- Door Locks & Latches
- Door Plates
- Door Pulls
- Door Rosettes
- Door Sets
- Doorknockers
- Doorstops
- Entry Door Sets
- French Door Hardware
- Gate Hardware
- Iron Door Hardware
- Kickplates & Thresholds
- Pocket and Sliding Door Hardware
- SALE! Clearance Door Hardware
- Storm & Screen Hardware
- Swinging Door Hardware
- House Hardware
- Window Hardware
-
Cabinet & Furniture Hardware
- Heat Grates & Registers
- Home Decor
- Kitchen
-
Lighting & Lamp Parts
- Beaded Bulb Covers
- Candle Covers
- Ceiling Canopies
- Ceiling Medallions
- Crystal Lamp Parts
- Electrical Sockets
- Lamp Chain
- Lamp Cord, Plugs & Switches
- Lamp Finials
- Lamp Fixture Parts
- Lamp Shades
- Lamps (Table & Floor)
- Light Bulbs
- Light Fixtures
- Oil Lamp Parts
- Shade Holders
-
Switches & Switchplates
- Push Button Switches
-
Switchplate Covers
- Aged Antique Brass Forged Switchplates
- Antique Brass Festoon Forged Switchplates
- Antique Brass Forged Switchplates
- Antique Pewter Festoon Forged Switchplates
- Antique Pewter Forged Switchplates
- Arts & Crafts Switchplates
- Bronze Copper Festoon Forged Switchplates
- Burnished Antique Brass Forged Switchplates
- CLEARANCE Switchplates
- Craftsman Oil Rubbed Bronze Switchplates
- Deco Aged Brass Forged Switchplates
- Deco Antique Brass Forged Switchplates
- Deco Antique Copper Forged Switchplates
- Deco Polished Nickel Forged Switchplates
- Deco Oil Rubbed Bronze Switchplates
- Deco Satin Nickel Forged Switchplates
- Deco Style Switchplates
- Egg & Dart Antique Brass Switchplates
- Egg & Dart Satin Nickel Switchplates
- Egg & Dart Switchplates
- Egg And Dart Oil Rubbed Bronze Switchplates
- Hammered Black Switchplates
- Hammered Copper Switchplates
- Jumbo Oversized Switchplates
- Matte Black Switchplates
- Meadows Switchplates
- Mottled Antique Copper Forged Switchplates
- New York Style Switchplates
- Oil Rubbed Bronze Forged Switchplates
- Polished Brass Festoon Switchplates
- Polished Brass Forged Switchplates
- Polished Brass Stamped Switchplates
- Polished Chrome Stamped Switchplates
- Polished Nickel Forged Switchplates
- Polished Stainless Steel Switchplates
- Polished Unlacquered Forged Brass
- Ceramic Switchplate Covers
- Raw Brass Stamped Switchplates
- Rope Switchplates
- Satin Brass Stamped Switchplates
- Satin Nickel Forged Switchplates
- Satin Stainless Stamped Switchplates
- Victorian Switchplates
- White Stamped Switchplates
-
Tile
-
Merola Tile
- Meraye Tile Collection
- Touba Tile Collection
- Monocolor Tile Collection
- Roma Tile Collection
- Myst Tile Collection
- Lumiere Tile Collection
- Touche Tile Collection
- Retro Strata Tile Collection
- Menorca Tile Collection
- Abadia Tile Collection
- Academy Tile Collection
- Adobe Tile Collection
- Aevum Tile Collection
- Alabama Tile Collection
- Alaska Tile Collection
- Alhama Tile Collection
- Alloy Metal Subway Tile Collection
- Alloy Tile Collection
- Alora Tile Collection
- Amaia Tile Collection
- Amberes Tile Collection
- Amberley Tile Collection
- Americana Tile Collection
- Andorra Tile Collection
- Antic Tile Collection
- Antigua Tile Collection
- Apini Tile Collection
- Aranjuez Tile Collection
- Arches Tile Collection
- Archivo Tile Collection
- Ardesia Tile Collection
- Argile Tile Collection
- Argos Tile Collection
- Aroas Tile Collection
- Arpeggio Rondo Tile Collection
- Art Deco Tile Collection
- Arte Tile Collection
- Artisan Tile Collection
- Aspdin Tile Collection
- Aster Tile Collection
- Atelie Tile Collection
- Atlantic Tile Collection
- Austina Tile Collection
- Avila Tile Collection
- Azores Tile Collection
- Bamboo Tile Collection
- Barcelona Tile Collection
- Battiscopa Tile Collection
- Benisa Tile Collection
- Berkeley Tile Collection
- Berta Tile Collection
- Betera Tile Collection
- Biarritz Subway Tile Collection
- BioTech Tile Collection
- Blanco Tile Collection
- Blend Tile Collection
- Boheme Tile Collection
- Bois Tile Collection
- Bombato Tile Collection
- Bora Tile Collection
- Bordon Tile Collection
- Boston Tile Collection
- Bourges Tile Collection
- Braga Tile Collection
- Brickyard Tile Collection
- Brixton Tile Collection
- Brooklin Tile Collection
- Cairoo Tile Collection
- Caldera Castle Tile Collection
- Camden Subway Tile Collection
- Canet Tile Collection
- Capri Tile Collection
- Caprice Tile Collection
- Captain Tile Collection
- Carpet Tile Collection
- Carrione Tile Collection
- Cartago Tile Collection
- Cassis Tile Collection
- Castellon Tile Collection
- Castillo Tile Collection
- Cava Tile Collection
- Cazorla Tile Collection
- Celadon Tile Collection
- Cemento Tile Collection
- Chalk Tile Collection
- Channel Tile Collection
- Checker Tile Collection
- Chelsea Tile Collection
- Chester Tile Collection
- Classico Tile Collection
- Coco Tile Collection
- Coleur Tile Collection
- Colmena Hex Tile Collection
- Colorado Tile Collection
- Compass Tile Collection
- Conchella Tile Collection
- Corinto Tile Collection
- Costa Tile Collection
- Cottage Tile Collection
- Country Tile Collection
- Crag Tile Collection
- Crackle Tile Collection
- Crown Heights Subway Tile Collection
- Crystalline Tile Collection
- Dakar Tile Collection
- D'Anticatto Tile Collection
- Daria Tile Collection
- Deco Tile Collection
- Domitia Tile Collection
- Dorne Tile Collection
- Doscotto Panal Tile Collection
- Dreamscape Tile Collection
- Duart Porcelain Tile
- Dubai Tile Collection
- Ebru Tile Collection
- Emotion Tile Collection
- Envoque Tile Collection
- Essenza Tile Collection
- Eterno Tile Collection
- Expressions Tile Collection
- Faenza Tile Collection
- Fantasy Tile Collection
- Farnese Tile Collection
- Ferraras Tile Collection
- Fika Tile Collection
- Fioretti Tile Collection
- Fitz Tile Collection
- Flo Tile Collection
- Flow Tile Collection
- Foresta Tile Collection
- Forever Tile Collection
- Fronda Tile Collection
- Gador Tile Collection
- Garden Tile Collection
- Gatzby Tile Collection
- Gaudi Tile Collection
- Gaugin Tile Collection
- Geomento Tile Collection
- Gotham Tile Collection
- Habana Tile Collection
- Habanera Tile Collection
- Harmonia Tile Collection
- Henley Tile Collection
- Heritage Tile Collection
- Hexatile Tile Collection
- Hidraulico Porcelain Tile Collection
- Horizon Tile Collection
- Hudson Tile Collection
- Huelva Tile Collection
- Imagine Tile Collection
- Indico Tile Collection
- Industrial Tile Collection
- Inedita Tile Collection
- Irazu Tile Collection
- Istanbul Tile Collection
- Jaen Tile Collection
- Jazz Tile Collection
- Java Tile Collection
- Joliet Tile Collection
- Karacter Tile Collection
- Kings Tile Collection
- Kite Tile Collection
- Klavier Tile Collection
- Klinker Tile Collection
- Komi Tile Collection
- Lacour Tile Collection
- Laja Tile Collection
- Larchwood Tile Collection
- Leticia Tile Collection
- Liverpool Tile Collection
- Livorno Tile Collection
- Llama Tile Collection
- Llanes Tile Collection
- London Tile Collection
- Luca Tile Collection
- Lustre Tile Collection
- Madison Tile Collection
- Magma Tile Collection
- Maheno Tile Collection
- Majestic Tile Collection
- Mandala Tile Collection
- Manises Tile Collection
- Manhattan Tile Collection
- Marcotto Panal Tile Collection
- Mare Tile Collection
- Marmaris Tile Collection
- Marquina Tile Collection
- Marwood Panal Tile Collection
- Masia Tile Collection
- Matter Tile Collection
- Mazzo Tile Collection
- Medley Tile Collection
- Melvin Tile Collection
- Merzoni Tile Collection
- Meta Metal Tile Collection
- Metal Tile Collection
- Metro Tile Collection
- Michigan Tile Collection
- Milano Tile Collection
- Mirambel Tile Collection
- Modena Tile Collection
- Moldura Tile Collection
- Monteca Tile Collection
- Montego Tile Collection
- Montesa Tile Collection
- Moonbeam Tile Collection
- More Tile Collection
- Mt Royale Tile Collection
- Mud Tile Collection
- Muretto Tile Collection
- Muro Tile Collection
- Nagpur Tile Collection
- Natura Tile Collection
- Nero Tile Collection
- Novecento Tile Collection
- Nusa Tile Collection
- Ocean Tile Collection
- Odda Tile Collection
- Oh My Tile Collection
- Ordino Tile Collection
- Orion Tile Collection
- Osaka Tile Collection
- Otono Tile Collection
- Oxford Tile Collection
- Palazzo Tile Collection
- Palm Hex Tile Collection
- Panama Tile Collection
- Park Slope Subway Tile Collection
- Parete Tile Collection
- Peak Tile Collection
- Pebble Tile Collection
- Pescado Tile Collection
- Phoenix Tile Collection
- Pictura Tile Collection
- Pisa Tile Collection
- Piscina Tile Collection
- Polaris Tile Collection
- Pompeya Tile Collection
- Porto Tile Collection
- Projectos Tile Collection
- Provenzale Tile Collection
- Quarry Tile Collection
- Raktion Tile Collection
- Rambla Tile Collection
- Recycle Tile Collection
- Renaissance Tile Collection
- Resort Tile Collection
- Retro Hex Tile Collection
- Retro Tile Collection
- Revival Tile Collection
- Rhombus Tile Collection
- Riga Tile Collection
- Royal Garden Tile Collection
- Rubik Tile Collection
- Rugosa Tile Collection
- Rustica Porcelain Tile Collection
- Sabina Tile Collection
- Saint Germain Tile Collection
- Saja Tile Collection
- Santorini Tile Collection
- Sawnwood Tile Collection
- Scala Tile Collection
- Sedona Tile Collection
- Sentier Tile Collection
- Sequoia Tile Collection
- Sevillano Tile Collection
- Simbols Tile Collection
- Sonar Tile Collection
- Spa Tile Collection
- Spiral Mosaic Tile Collection
- Spirit Tile Collection
- Spring Tile Collection
- Squire Tile Collection
- Stella Tile Collection
- Strawberry Fields Tile Collection
- Suomi Tile Collection
- Taco Tile Collection
- Tahiri Tile Collection
- Tangram Tile Collection
- Tech Land Tile Collection
- Techniker Tile Collection
- Terra Tile Collection
- Terre Tile Collection
- Tessera Tile Collection
- Tetuan Tile Collection
- Textile Tile Collection
- Tierra Tile Collection
- Tikal Tile Collection
- Timeless Tile Collection
- Tinos Tile Collection
- Tivoli Tile Collection
- Tovar Tile Collection
- Tower Tile Collection
- Traffic Tile Collection
- Trend Tile Collection
- Trenza Tile Collection
- Triangle Tile Collection
- Tribeca Hexagon Tile Collection
- Trident Tile Collection
- Triplex Tile Collection
- TRUE Tile Collection
- Tula Tile Collection
- Tuscany Tile Collection
- Twenties Tile Collection
- Twist Tile Collection
- Underground Tile Collection
- Unique Tile Collection
- University Tile Collection
- Urban Tile Collection
- Ursino Tile Collection
- Valor Tile Collection
- Vanity Tile Collection
- Venice Tile Collection
- Viena Tile Collection
- Vintage Tile Collection
- Visium Tile Collection
- Viva Tile Collection
- Volterra Tile Collection
- White Tile Collection
- Woodstrip Tile Collection
- Zahara Tile Collection
- Zinc Tile Collection
- Zurbaran Tile Collection
- Marble Mosaic Tile
- Porteous Tile
- Subway Tile
- Unglazed Porcelain Mosaic Tile
-
Merola Tile
- Tin Ceiling
- Gift Cards
A Guide to Stripping Painted Hardware
02 Jun 2011
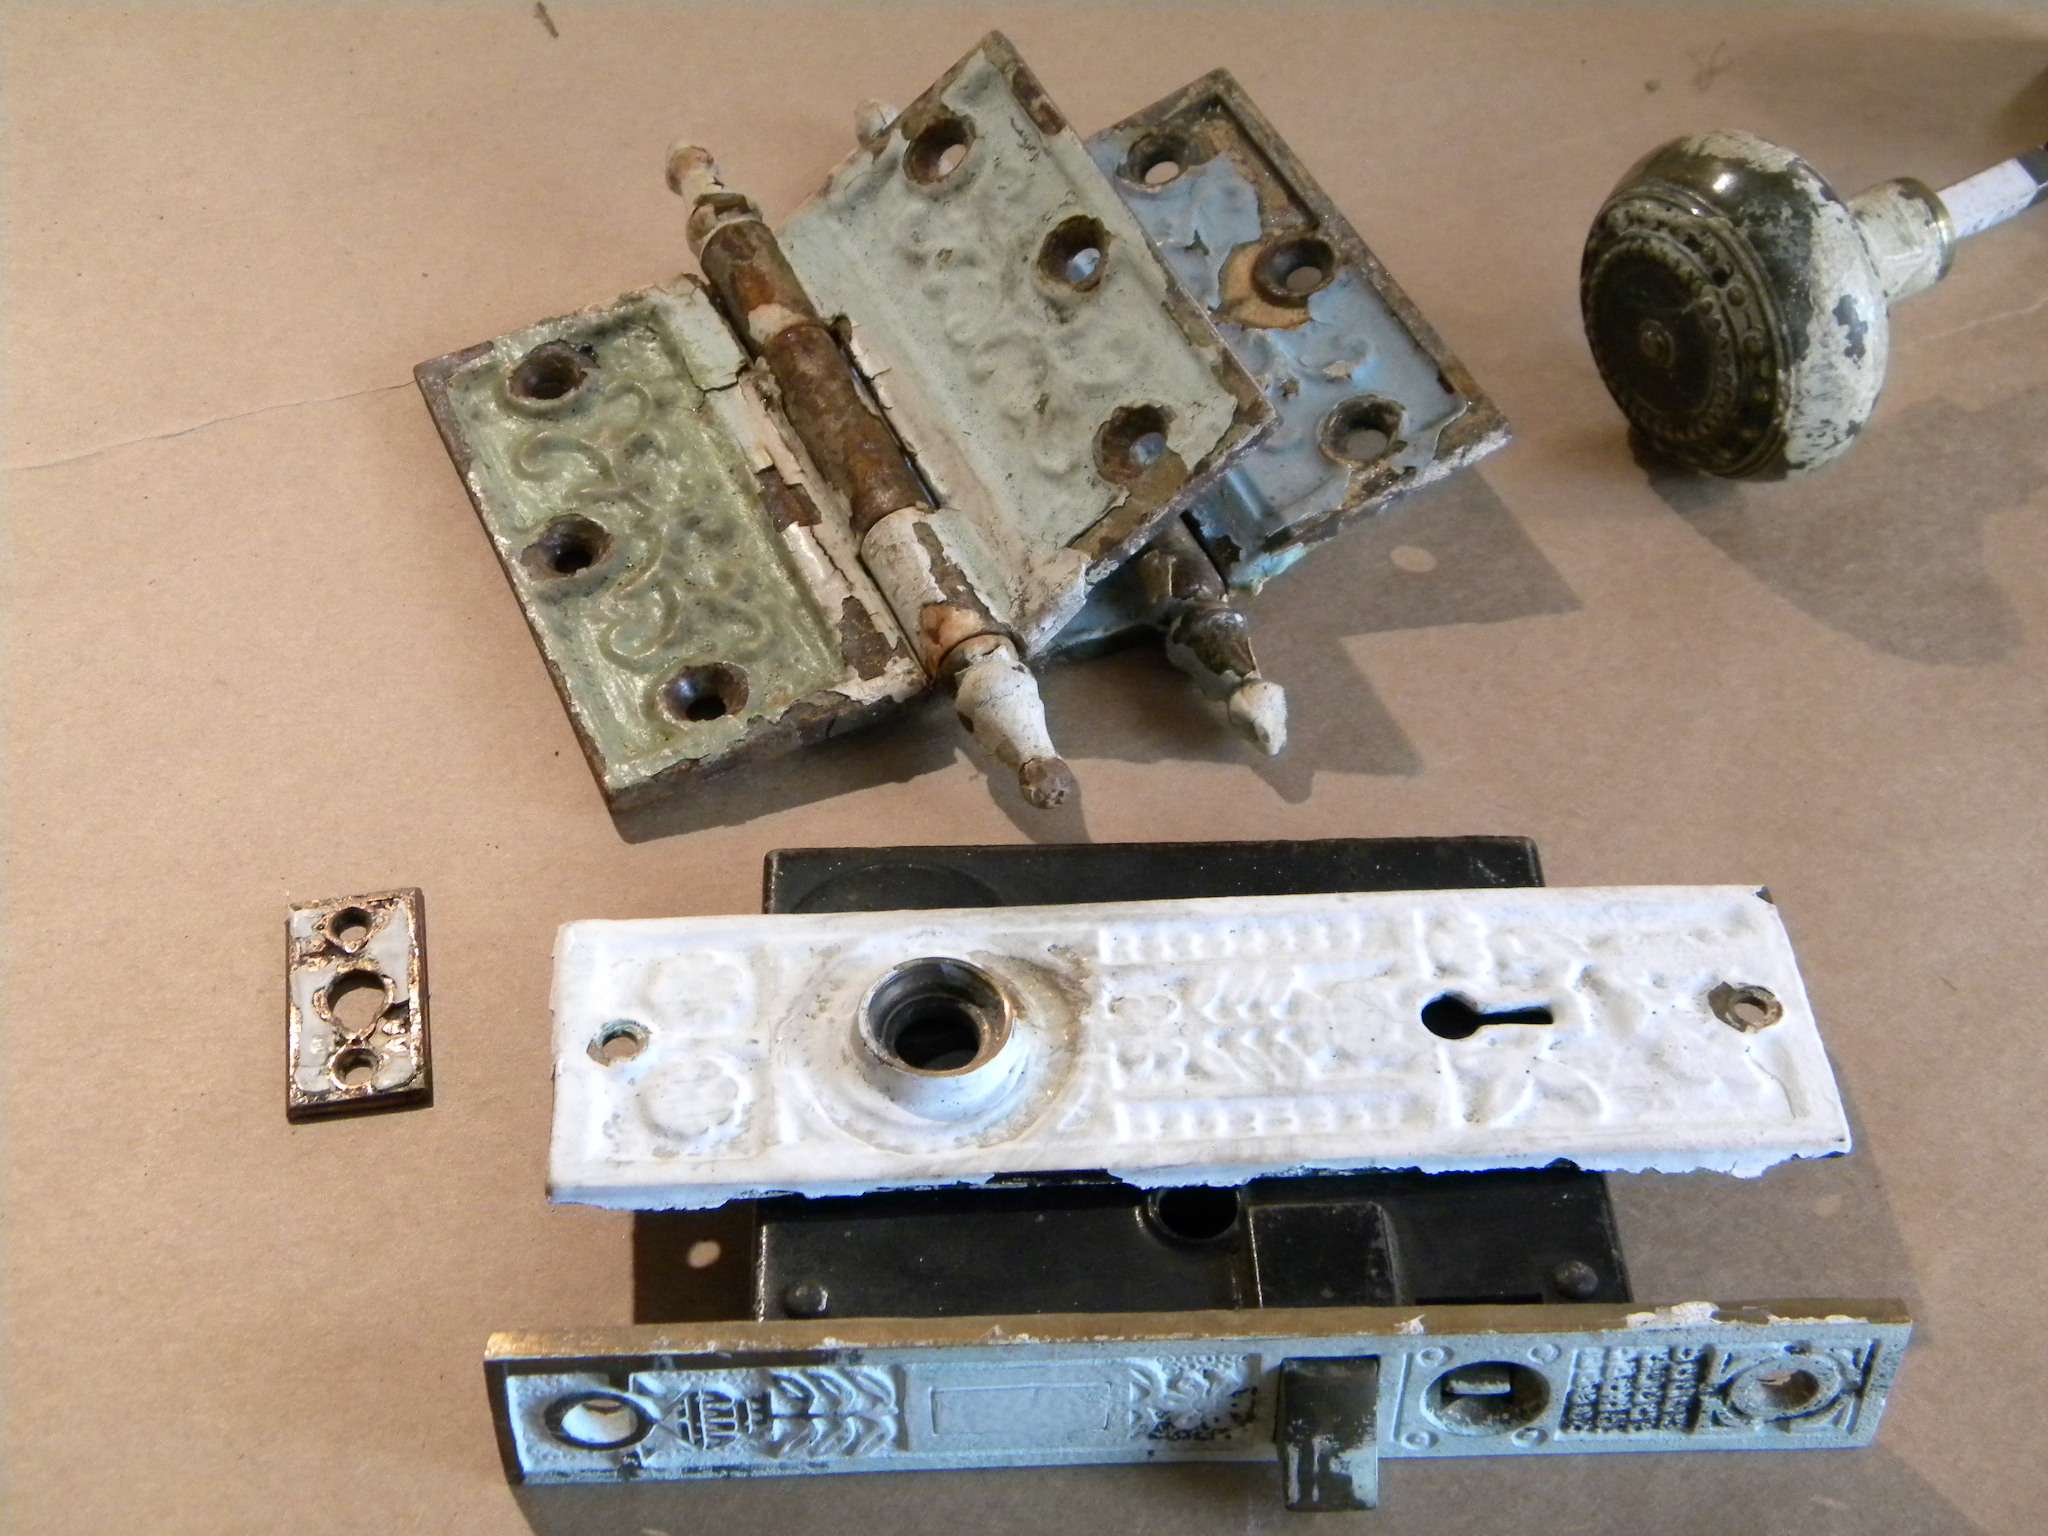
Why in the world did they paint all the hardware?!? Sometimes they were following the height of fashion when paint became affordable and available to the middles class. (Who wants to look at all those out of fashion and unsightly oak doors with solid brass hardware?) For a lot of iron hardware it was painted black at the factory so it wouldnt rust. Sometimes the paint was added to hide deterioration on plated hardware. Lets face it though, most of the time carelessness led folks to not to remove the hardware when painting or to just slap another coat on top.
Thankfully restoring your vintage hardware has never been easier. While it is true that a good quality stripper will work just fine this method has several limitations. It needs adequate ventilation to be used indoors and can be expensive if you are doing a lot of hardware. Our favorite method at Historic Houseparts is to use a crock pot. We simply fill it with hardware, add water till it is covered, add a small squirt of dish detergent, a little basil (just kidding) and let it cook on low overnight. Viola in the morning the heat and water have softened and loosened the paint so it can be peeled or scraped off. There is no smell; it keeps the lead paint wet and much less of a danger, and there is virtually no expense.
I wholeheartedly recommend this method but I do suggest one thing before you take all the hardware off your doors, cabinets, and windows, test one piece first to see how you like the result. You might discover that your hardware is rusted and damaged beyond what you consider acceptable and you may decide that it is time to replace rather than restore.
Here is a list of the tools that help me to clean hundreds of pieces each year.
- Crock pot - destined never to be used for culinary purposes again
- Large slotted spoon or pair of tongs - for grabbing items out of the murky water
- 1 x 2 foot piece of cardboard - a soft, absorbent, disposable work surface
- A small thick towel - to hold hot items, sop up water, and wipe away grime
- A stiff plastic scraper - for pushing paint off the hardware
- Shown in the picture is a wooden scraper I made that is more comfortable to grip and has a point at one end for cleaning out the screw holes
- A flat head screwdriver for when you really need some extra help to get under the paint Go gently on solid brass and do NOT use on plated surfaces!
- I also have a custom tool for this. Pictured is a very large square cut nail that has been flattened at one end. It has a finer edge than most screw drivers and is just old and cool
- A large brass bristle brush for scrubbing These are great for many things, get 2!
- A dental cleaning tool for those tough corners and crevasses most drug store have them and they can be bent so you have one straight end
- A magnet for testing what metal is under the paint solid brass is not magnetic Beware if you think you might have post WWII hardware you might run into aluminum or zinc which is plated but not magnetic
- Nevr-Dull for basic cleaning and polishing Awesome product! http://www.historichouseparts.com/detail.aspx?ID=2588
- Bench grinder with wire wheel and/or a cloth wheel and metal polishing compound - optional
- Eye protection, HEPA dust mask and rubber gloves for yourself
Steps
 |  |  |
 |  |  |
- 1. Remove hardware and screws score along the edge of the hardware so you dont damage wood or surrounding paint that is staying - label hardware on back with a permanent marker and place in labeled baggies with their screws Warning! Gently pry out tight door hinges, iron hardware can snap apart if twisted.
- 2. Gently place a batch in a pot cover with water add a squirt of dish detergent cover and cook on low overnight or at least for several hours.
- 3. Take one item out at a time - if they cool off the paint will harden back up Beware! of the heat of the hardware iron will hold the heat much longer than brass. Dont forget to take the doorknobs off the spindle and let the water drain out. Dont submerge mortise locks
- 4. Push or peel the paint off with your scraper. Test with a magnet if you havent already. Do not use the screwdriver on items that have a plated finish or you may damage the plating.
- 5. Use the brush once most of the upper layers have been removed. Use the dental pick to get those stubborn corners of paint. If it cools off just throw it back in and work on a few other pieces for a while.
- 6. If you have a wire wheel available you can use it to quickly remove the last of the paint. Be sure to wear heavy gloves, eye protection and your HEPA mask for this part! Some of the bottom layers are a deviously durable oil based paint and you may need to use stripper or a wire wheel on these.
- 7. Remove residue with a rag or by rinsing in clean water. Rub with Nevr-Dull to tarnishing if desired; wipe periodically to remove loosened grime. If a like new finish is desired use a cloth wheel and polishing compound to greatly speed the process.
- 8. Dispose of all the disgusting crud in a plastic trash bag or and follow your local EPA regulations. Try not to pour the sludge at the bottom of the pot down the drain.
- 9. Protect your hard work Wipe iron and steel hardware with Feed-n-Wax to protect from rust. Repeat once a year or as needed. OR Paint your hardware with a thin coat of metal paint and stipulate in your deed that no one is allowed so slop paint over it ever again
Posted on Products :
Nevr-Dull Brass Polish,
Blue Bear Lead Based Paint Stripper - 1 Gallon,
Blue Bear Lead Based Paint Stripper - 1 Quart,
Blue Bear Lead Based Paint Stripper - 2 Gallons,
Blue Bear Lead Based Paint Stripper - 5 Gallons,
Blue Bear Paint & Urethane Remover (Soy Gel) - 1 Gallon,
Blue Bear Paint & Urethane Remover (Soy Gel)- Quart,
Blue Bear Paint & Urethane Remover - 2-1/2 Gallon,
Blue Bear Paint & Urethane Remover - 5 Gallon
Comments